Selection profile manual
This article is under construction
Pleas note! The best setting differs based on the system used, before setting up a selection profile please contact your software vendor to discuss which settings are the most matching with your software package.
Creating a selection profile
To use a selection profile you need to log into the My 2BA environment using an active 2BA account and its password. A 2BA account is linked to certain user roles:
1A Superuser role
A user with this role can maintain all selections within their company by clicking on the left menu My Company/Selectionprofiles.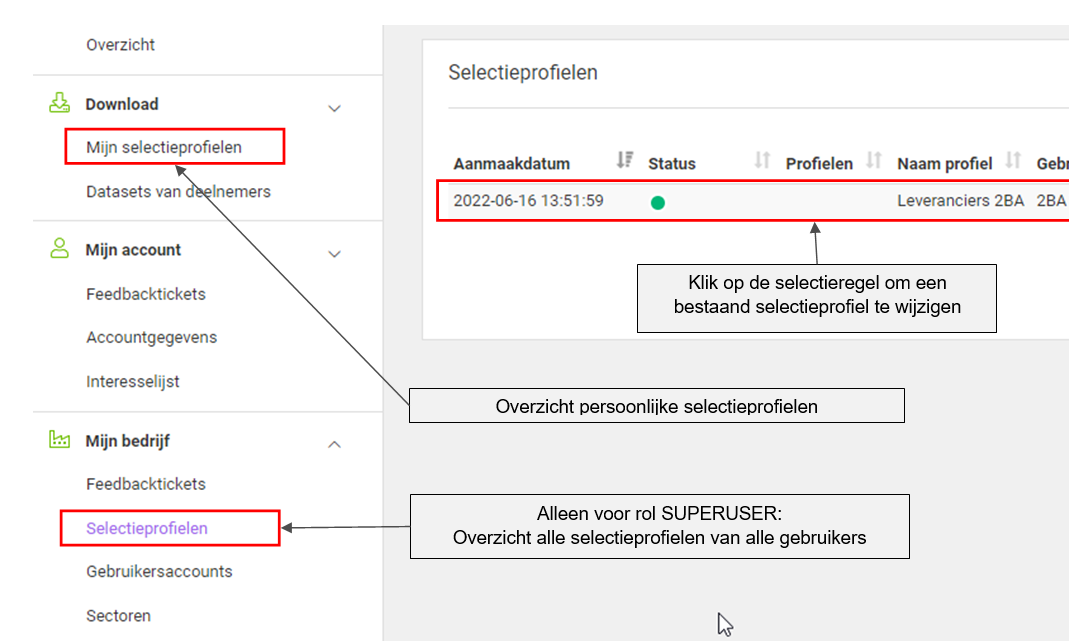 To view or edit an existing selection profile click on the relevant selection profile line and refer to the instructions under Basic settings.
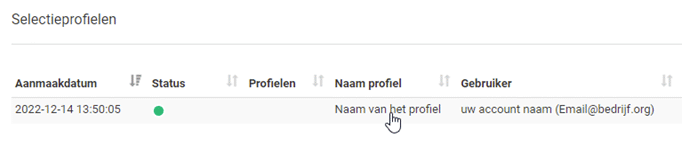
1B Download role
A user with this role can create a selection profile for themselves under the menu Download/My selectionprofiles
2A Creating a new selection profile from the SUPERUSER role
A superuser can create a selection profile for all users in their company who have been assigned the download role. In the upper right corner click on the green button New.
Search for the user within your company for whom you want to create a selection profile or click on Create profile for my account if you create a selection profile for yourself.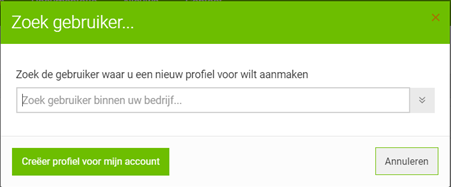 Afterwards in step 3 you can provide a profile name and choose an exchange format.
2B Creating a new selection profile from the role DOWNLOAD
 Click on the green button New. Afterwards in step 3 you can provide a profile name and choose an exchange format.
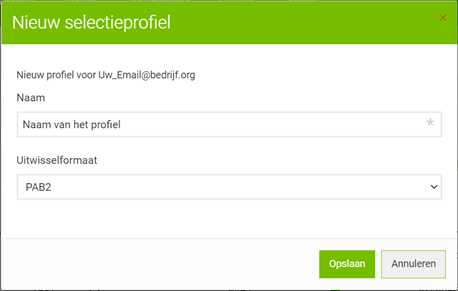
3. Create a name for a selection profile and set up the exchange file format
Name:
A name that matches the specific purpose of the selection profile, it’s suggested to use the company name. Please make sure not to include special characters.
Exchange format:
Provides a choice of exchange formats including ETIM xChange, DICO/SALES005, BMEcat 2005 or PAB2. The choice of the exchange format has to match the file format supported by your software package. If in doubt, please contact your software vendor to find out which exchange format matches your software package.
By clicking the button Save a new selection profile is created and the overview page of the profile is opened.
Editing a selection profile
Click on the line of the selection profile to edit the selection profile.

Click above for a large image
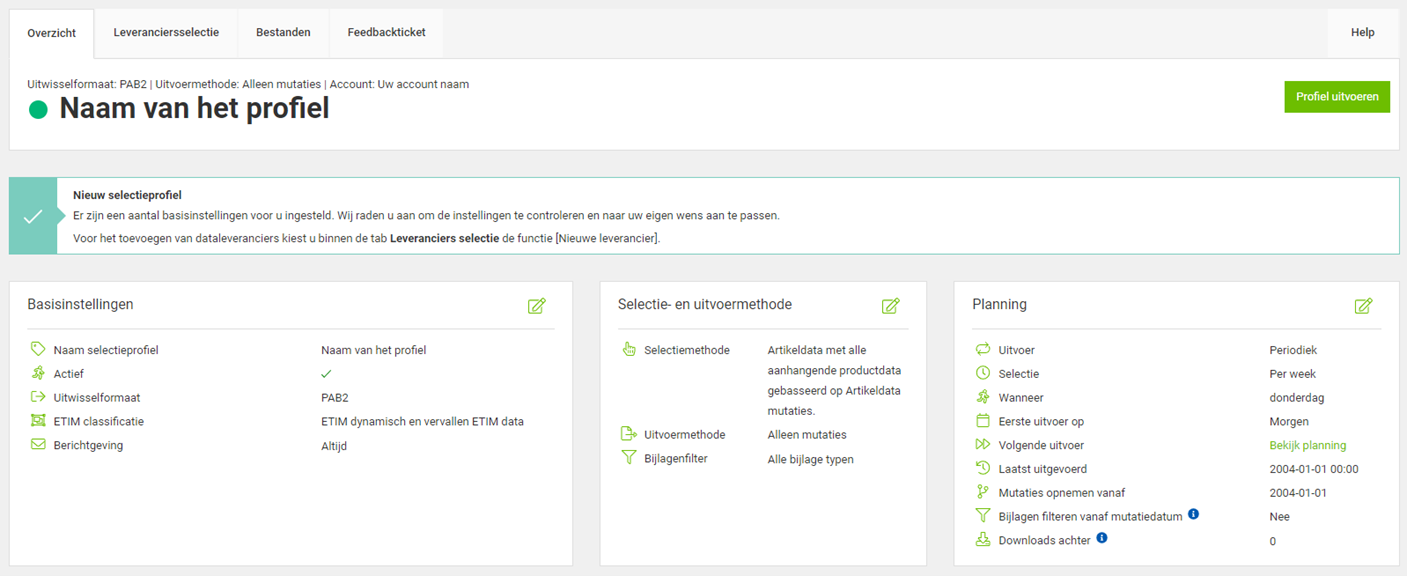
Overview
A profile is set up using several basic settings. Whilst creating a selection profile we recommend you to check its settings and adjust these to your own personal requirements. However, even after creating a profile you can still adjust all of its settings. Always start adjusting by first examining whether the basic settings on the overview page are still correct.
Click above for a large image
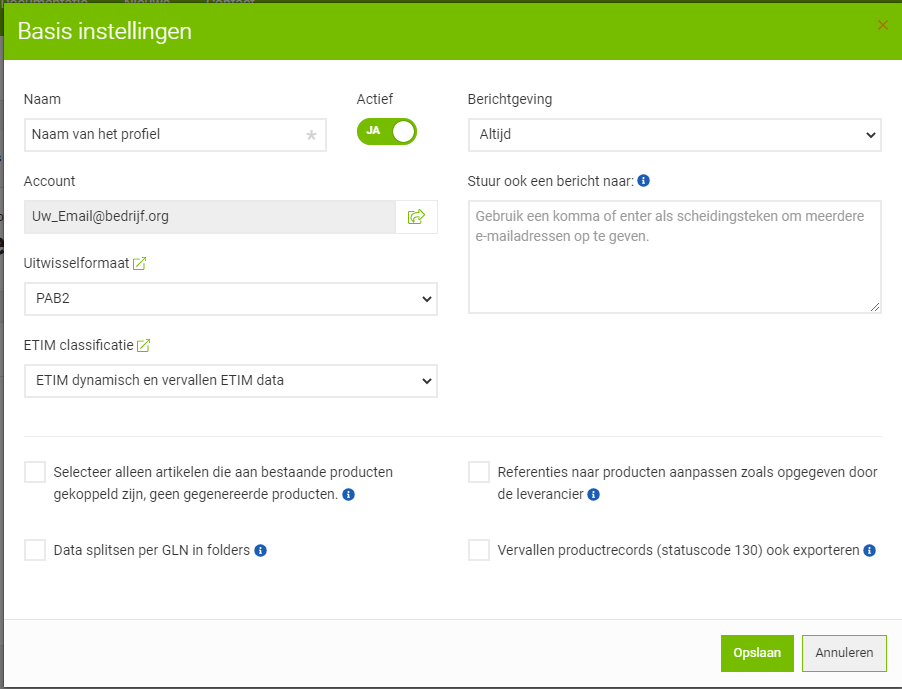
Basic settings
Open the basic settings by clicking on the Edit icon (green square with a pencil) in the top right corner of the Basic settings field. You can set up or check the following settings required for your profile.
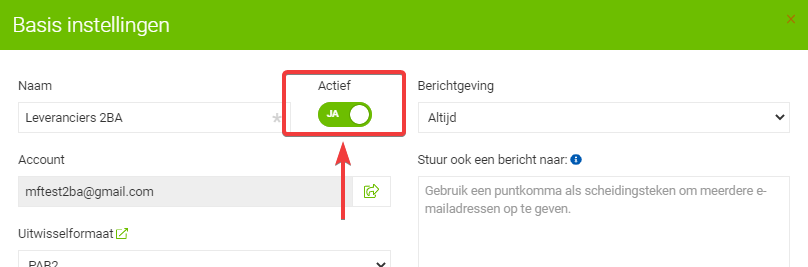
- Name selection profile: here you can adjust the name of the profile.
- Active: you can activate or deactivate your profile with this switch.
- Exchange formaat: set the preferred exchange format using this setting.
- Reporting here you can choose the frequency of notifications of the processing of your selection profile;
– Always (our recommended standard setting)
– Only if data is detected
– Off - Also send an mail to: you can use this to add one or more additional email addresses (separated by a semi-colon “;”) to which a copy of the email has to be forwarded.
You will also find a few advanced options here which you can keep at their standard setting.By clicking on the button Save all adjusted settings will be saved.
Selection and export method
Open the export method screen by clicking on the Edit icon in the selection and exportmethod. Change or check the following settings applicable to the profile.
- Selection method:
Choose which type of export you’d like to receive from selected data suppliers.
– If the line starts with trade items, all trade items within the supplied selection lines will be selected.
– If the line starts with product, all products within the supplied selection lines will be selected. - Export method:
– Mutations: Most systems use this export method, this method compiles per selection line only the changes of each data supplier starting with the submitted mutation date or date of the last download.
– Complete: This method compiles the current assortment of selected data providing companies and can result in very large files. - Attachment filter:
Choose which attachments will be exported (standard setting: all) and filter out the preferred file formats.
By clicking the button Save the changes made to the selection and export method settings will be saved.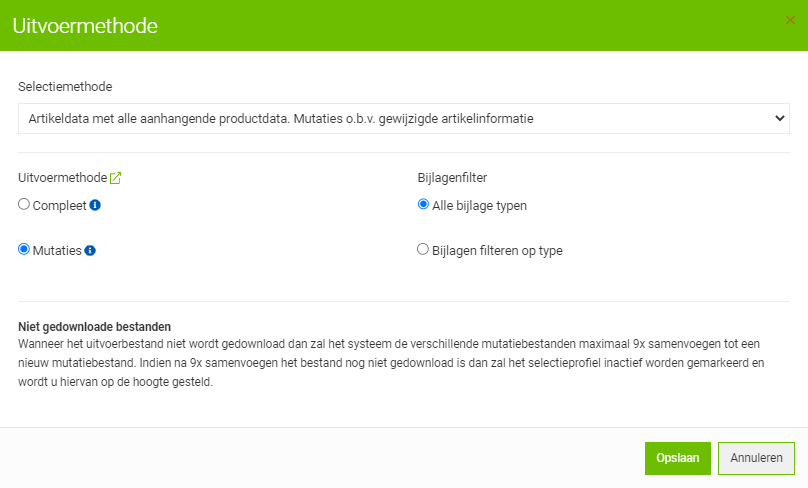
Planning
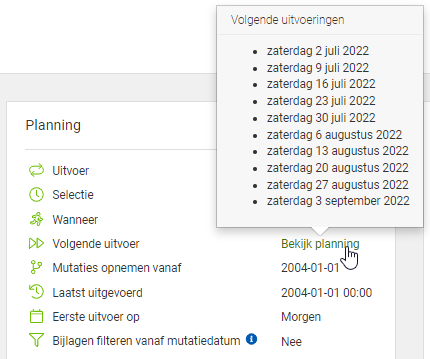
Open the planning settings by clicking on the Edit icon in the Planning field. Change or check the following settings applicable to the profile.
- Run: choose whether to set the selection profile to be processed once or periodically. It is adviced to set up the selection profile to be processed regularly (at least weekly) in order to latch onto strong price changes.
- First execution date: in this field you can submit when the selection profile should be processed for the first time. This can be convenient if you prefer to let the profile start processing on a date in the future. Please note that the selection profiles always get processed in the morning.
- Record mutations from: select a starting date from which the selection profile should start compiling and processing data. Once a selection profile has been processed this date will be automatically shifted to a next date which ensures that you will always receive the mutations from the period in between the mutation starting dates. For a new selection profile this date has a preset setting of 1 January 2004 which means that when running this profile you will receive all data from your selection, since all data has been processed on / after January 1 2004 on 2BA. If you missed the mutations from a certain period, for example because your selection profile was inactive, you can adjust the Include mutations starting from date to the last date that you’ve imported mutations.
- Filter attachments from mutation date: with the switch set to YES the set up mutation date will be used to export all attachments which have been added to the product since the mutation date. Older attachments will not be exported.
- Run per: Select as process frequency Daily, Weekly or Monthly. Afterwards select the days or months on which the selection profile needs to be processed. If set up for weekly processing, by using Interval you can set up per how many weeks the selection profile should be executed. The standard setting is Weekly.
By clicking the button Save the changes made to the selection and processing method settings will be saved.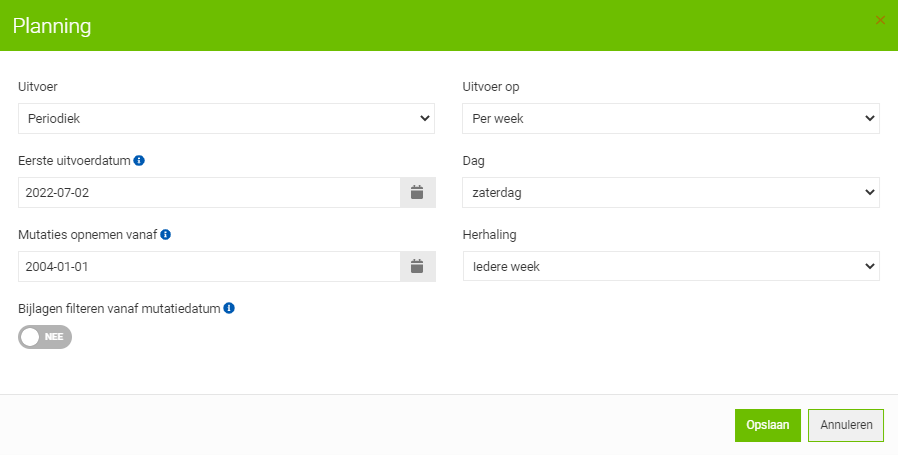
After editing the planning, you can find a list with the dates on which your selection profile will be processed at Next run which can be found in the Planning field of the tab Overview.
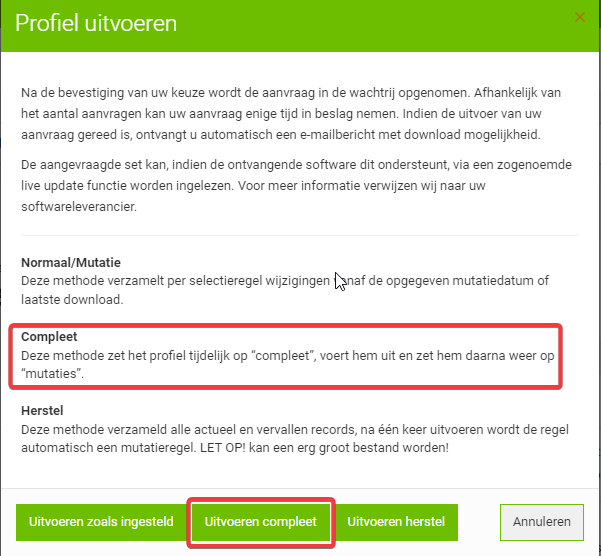
Run profile (button)
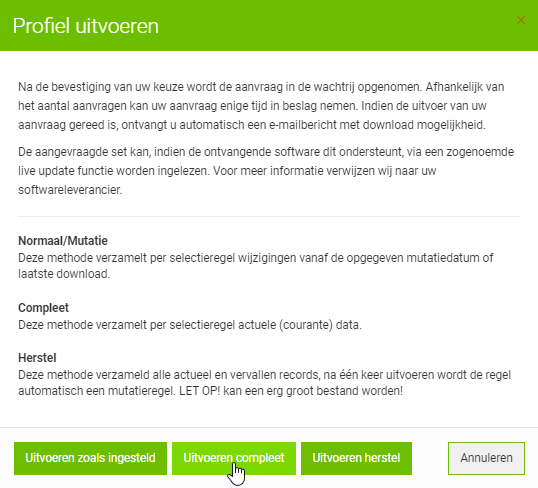
With the button Run Profile you can manually start the selection profile to process in between automatic runs. One of the most common reasons to manually start the processing of a selection profile is that the data in your system appears to be incomplete. Follow the steps below to request a one-time, complete export.
- Click on the button Run profile
- Click on the button Run complete profile
- Please wait until you’ve received an email from 2BA informing you that your profile has finished processing and start importing the data as usual.

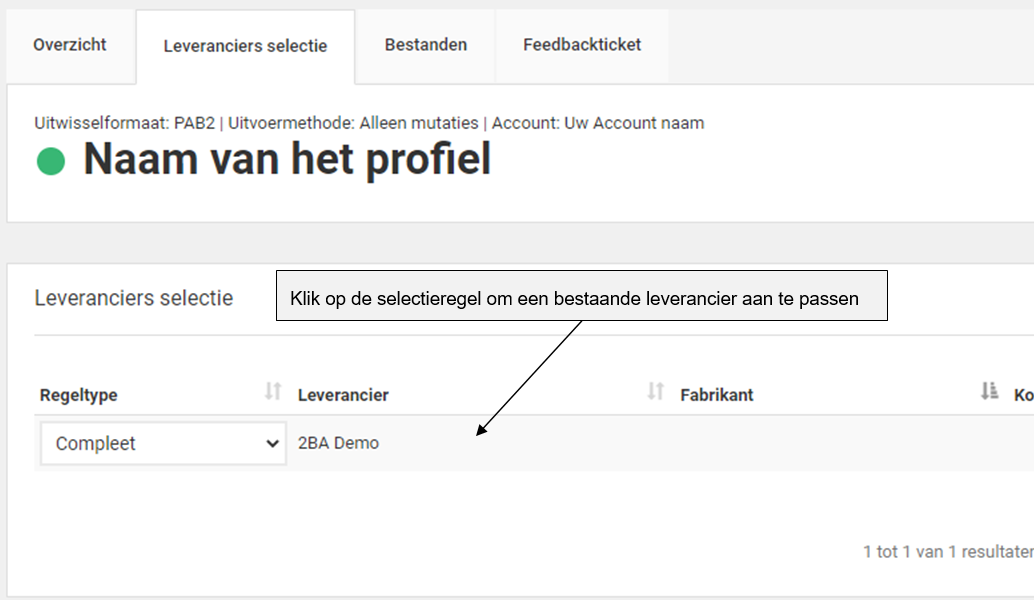
Data supplier selection
After you’ve examined and adjusted the settings on the overview page you can provide your selection lines. Switch to the tab Supplier selection.
Select a new data supplier
Click on New supplier to select a new data supplier.
Using the search window you can select companies you’d like to receive data from through the selection profile. Besides company name you can search for companies based on their GLNs. 2BA will (after entering the first few letters of a company name) show a list of available data suppliers from which you can choose. The standard display setting for search results is to display all data suppliers which currently supply product and/or trade item data. If you want to search for a data supplier which has not yet started uploading data to 2BA you can switch on the option Show all suppliers, in this manner you’re telling the system that you wish to receive data from this data suppl once available.
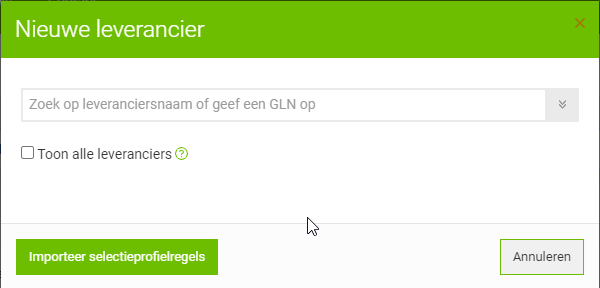
Import selection profile lines: With this option you can select or import multiple data suppliers using a selection profile or an ICC file.
- ICC Condition Message: If you import an ICC message, filtered selection rules are inserted based on the specified discount groups and item codes.
- TSV file: for more information on the buildup of this file type please refer to TSV-format definition

Adjusting existing Data suppliers
Click on a line to adjust the setting of that selection line.

Selection line type
When creating a new selection line the line type has a standard setting of Complete. Please note! After one processing run of the selection profile the selection line will automatically be adjusted to the export method which is set up for the full selection profile (which is Complete or Mutations).
- Complete: this selection line type compiles the current assortment of the data supplier selected for this selection line into the selection profile. Therefore the ‘starting from mutation date’ field is not taken into account.
- Mutations: this selection line type compiles the mutations of the selected data supplier starting with the supplied ‘starting from mutation date’ or the data the selection profile was last downloaded. This contains the mutations supplied by the data supplier in terms of trade items and/or products depending on the selection method.
- Recovery: this selection line type compiles both the current assortment and the expired products and trade items of the selected data supplier. Using this selection line type can result in a large exported file. The assortment “expired” consists of products with status code “expired” and removed articles from the 2BA datapool. Therefore you’ll receive a file with both products and/or trade items currently available from the data supplier’s assortment as well as products and/or trade items that were once available.
Remarks:
- The PAB2 exchange format doesn’t support the status code “expired”. You need to cross this in the “Basis settings” of the selection profile in the tab “Overview”.
- The export method “Restore” can only be set up on selection line level if the selection profile is set up for export method “Mutations”. After the selection line with line type “Restore” has been processed, it will automatically be changed to line type “Mutations”.
- This export method can result in a very large file.
- Data suppliers remove products which aren’t manufactured anymore, however the product data of these will be retained as archived data as well as a reference record for trade item records from data suppliers which refer to these products.
Selection line Assortment
 Kies vervolgens het assortiment voor deze selectieprofielregel:
- Everything: choose this option if you want to receive all available trade item and/or product data.
- Product range: choose this option if you want to set up a filter based on separate product assortments. Remark: this option is not available for all data suppliers. Complete product assortments (or separated product assortments) are groups of products which are part of a certain group or have an encompassing name. In this manner a data supplier can seperate their electric, sanitary and heating product data in separated groups of articles. The link between assortments and articles is created based on the selection of allowance groups. In order to use this system it is important to be able to decide to which group an article belongs based on the discount group.
- Advanced filtering: choose this option if you’d like to filter data based on a certain characteristic. You can fill in multiple search fields but only the allowance groups fields support multiple search entries. Additionally the search fields marked with an asterix support wildcards.
Selection line expanded filter
For every selection line at least one of the following fields needs to be filled: Supplier, Brand, Allowance Group, Trade item number.
 By clicking the button Save the changes made to the selection and processing method settings will be saved.. Herhaal de bovenstaande stappen totdat alle gewenste leveranciers als regel(s) in het selectieprofiel zijn opgevoerd. Bij uitgebreide filtering kan een leverancier meerdere keren met verschillende selecties opgevoerd worden.
Remarks:
- A selection profile is always processed by our system in the early morning.
- A selection profile will be switched off it has been processed 10 times without having been downloaded.
- Mutation files will be combined into a single file containing 3 weeks worth of mutations in case you’ve set up the selection profile to be processed weekly but didn’t download this for 3 weeks.
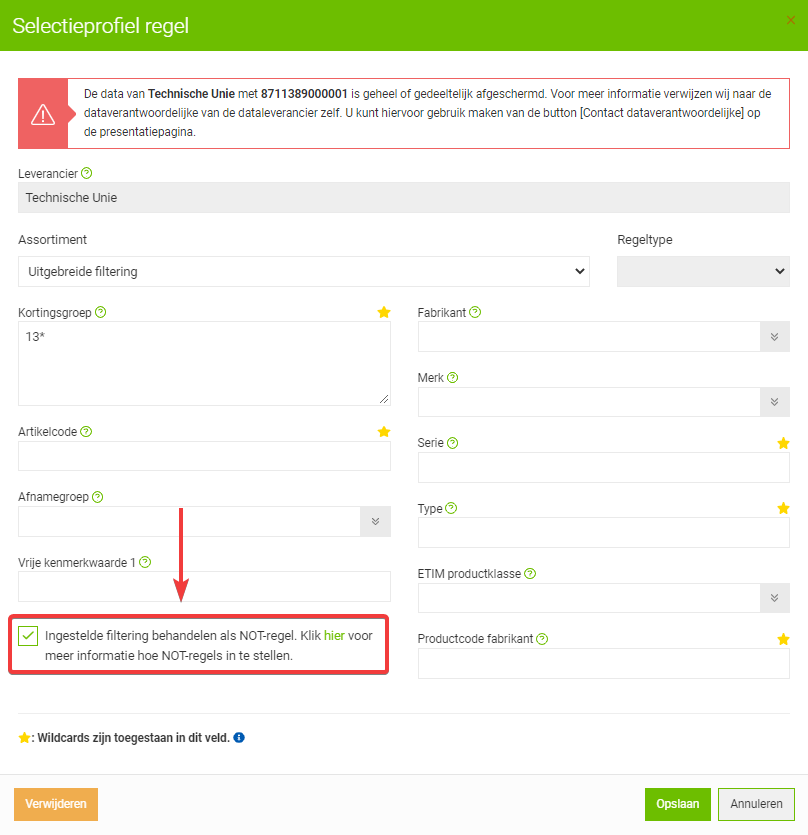
- You can make use of a filter based on NOT rules which are comparable to the selection generated by regular selection lines. However NOT rules filter out articles to be excluded from the selection profile export.
NOT rules
You can supply NOT rules which are similar tot the selection generated by regular selection profile lines. Whereas regular selection profile lines select data, NOT rules filter out data from the search results and therefore NO rules can only be used in combination with the regular selection line of a data supplier.
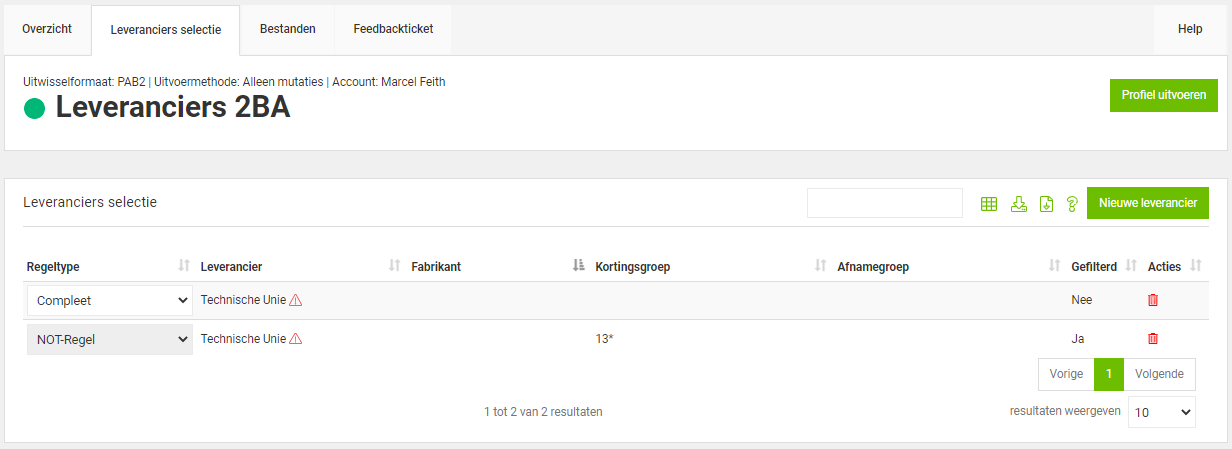
Example 1
An assortment in which all article records which carry the allowance group starting with 13 are filtered out (we show Technische Unie as a data supplier in this example)
Click above for a large image
- Add a selection line for the complete assortment of Technische Unie and set “Assortment” to “Everything”.
- Afterwards add a new selection line for Technische Unie and set “Assortment” to “Advanced filtering”.
- In the field “Allowance group” fill in the preferred value of “13*”
- Finally turn on the option “Treat line as as NOT rule.”
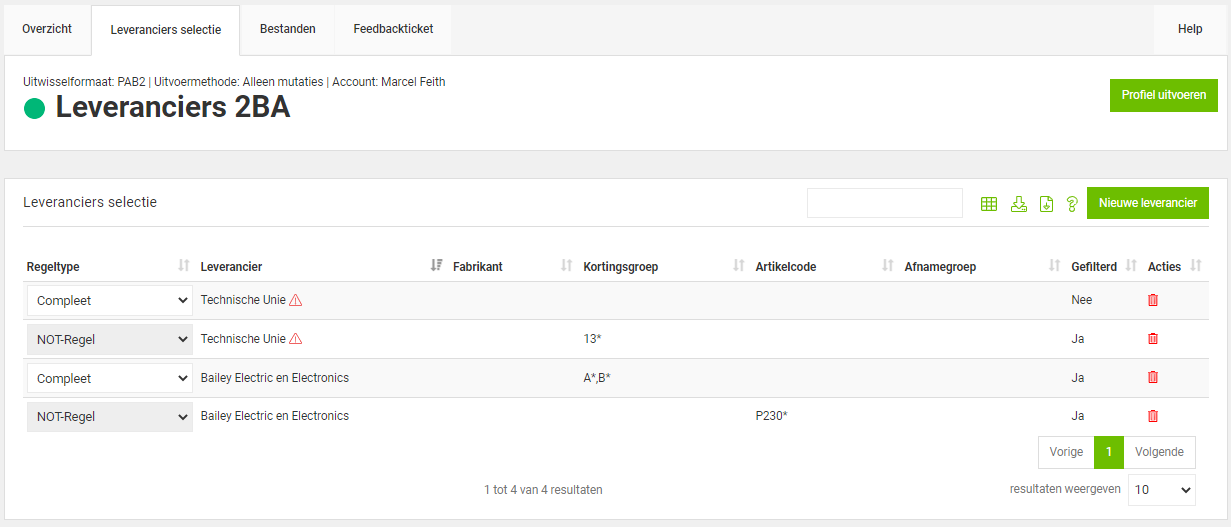
Example 2
An assortment in which all trade item records which carry an allowance group starting with 13 (13*) are filtered out, complimented with an assortment of all trade items carrying a discount group starting with A or B – unless the trade item code starts with P230* (we take Technische Unie and Bailey Electric and Electronics as an example).
Click above for a large image
The example above has been expanded in the following manner:
- Add a selection line with a filtered assortment for ‘Bailey Electric and Electronics’ (set “Assortment” to “Advanced filtering”).
- In the field “Allowance group” fill in the preferred values “A*;B*”.
- Afterwards add the new selection line ‘Bailey Electric and Electronics” and again choose “Advanced filtering” under “Assortment”.
- Under “Article code” fill in the preferred value “P230*”.
- Finally switch on the option “Treat line as NOT rule.”
Files (export)
Please note that exported files from a selection profile are compressed using the BZip2 method and cannot be opened using the standard Windows Explorer.
Automatic processing
If your software package supports automatic processing we recommend you to primarily set up your selection profile files to be processed automatically. The 2BA system will ensure that these files are ready by the morning. You can then download the processed selection file exports by evening or otherwise by the next day. After successfully processing the data in your system we recommend you to use your software package to remove the files on 2BA.
Automatically exporting the selection profile files to your software can be done through webservice SelectionProfile.
Manual processing
Usually after every processing run of a selection profile you will receive an email from the 2BA system containing 2 URLs, the first of which is a detailed report of the exported data and the second is a direct URL for the file which enables you to easily download the exported data.
It’s also possible to download processed selection profile exports through the tab Files. On this tab you can also remove any unused or already downloaded files. Via the menu Download > My selection profiles you will see a list of your profiles. Click on a profile and switch to the tab Files, here you will see all downloads for the currently selected selection profile. A maximum of 3 files will be available.
Reactivating a selection profile
Follow the instructions below to prevent working with outdated data.
Step 1. Import the currently ready files
Depending on your software package it might still be possible to import and process the data. If your software package doesn’t support this under the tab ‘Files’ of the selection profile you can still download the data set manually.
*** If you don’t follow this action you need to follow Step 4 Run selection profile Complete! ***
Step 2. View your selection profile(s) at my.2ba.nl
After you’ve imported the last processed dataset please browse to the overview of your selection profiles by logging into My 2BA using your email address and password. Afterwards on the screen My Selection profiles choose the selection profile you’d like to activate.
Step 3. Activating selection profiles
In the tab Overview click on the edit icon in the tab Basic settings.

Set the switch Active to Yes and click on Save.
At the next periodic processing run (refer to the panel Planning in the tab Overview) the rest of the missing data will automatically be included.
Step 4. Running a selection profile Complete
If you’re unsure whether all data has been processed correctly you can request a one-time, complete export run of the data from your selected data suppliers. For each data supplier you will then receive the full and current assortment.
– To do this click on Run profile in the Overview tab of the selection profile.
– Click on Run complete profile to start running the selection profile process.
Once the selection profile processing has been completed you will automatically receive an email with a download link and you can process the data set in your system as usual.
Tips
Do you receive a notification that your selection profile cannot be run?
– Possibly you’ve recently upgraded to a new operating system or you make use of antivirus software which blocks the download of the dataset. Please contact your software vendor for a solution
Did you forget your password?
– We do not have access to your password. You can only reset your password through this link.
Please note!
If you reset your 2BA password you might also have to reset this in your software package. Please ask your software vendor if this is the case, we cannot support you with that.
Feedback system
Do you have a question or remark related to the selection profile you can ask this directly from the selection profile by creating a feedback ticket. Switch to the tab Feedback ticket and click the green button New.
- Enter a short description of your question in the field Title.
- In the field Description / original notification fill in a detailed description of your question.
- Optional enter external copy holders to forward the ticket to other people.
Please note!
The filled in CC’d person contact cannot view the feedback ticket on 2BA itself but can reply to it by emailing to feedback@2ba.nl with a mention of the feedback ID (h.####). - If your question is more extensive you can also attach a document file containing further details.
The buttons and their functions:
| Edit settings | |
| Run profile | |
| Show direct profiles | |
| Show removed profiles | |
| Create feedback | |
| Remove profile |


